
Client-Side Authentication in Next.js using Cookies
A step-by-step guide to managing client-side authentication with cookies from the client-side in Next.js


It's always been a hassle to manage authentication especially when it comes to setting up a new project.
I'll be honest, despite having more than a year or two's experience in web development, it's still difficult to implement a client-side authentication that just works. However, recently, I was working on a web application that requires it, and after quite some trials and errors, I came up with my own template for authentication!
I'll be sharing the authentication template in this article, and am open to feedback 💬 if any of you see potential issues in it!
PS: This article uses page router because I came across quite some pains when working on the app router.
Here's how it'll work on codesandbox, and the completed codes on GitHub: nextjs-client-authentication
Rationale

Many things work, just like this template, but you might question or even disagree with what I am doing. I'll try to explain why did I choose this approach, but if you just want the codes, skip ahead to Project Setup.
How it Works
It's super simple, in short, it works like the following:
The server sets the cookies on requests upon logging in
The client will make a request to get the current user's information (the backend will check the cookie and attaches the information if valid, or 403)
The information will be stored somewhere in the client
Every page will be marked as either public or requires authentication
Before displaying the page component, the client will check if the user is authenticated to view, else the user will be redirected using a wrapper component
Have you heard of NextAuth (Auth.js now)?
Indeed I do! And yes, NextAuth is quite powerful for a full-stack application.
Even Next.js's documentation recommends it, but again, this project focuses on client-side implementation. I mean, some of us use Next.js for client-side only. (Personally, I still prefer like Flask, Laravel, or even Spring for anything bigger)
However, NextAuth, and some of its alternatives (like Iron Session) only provide full-stack solutions, or at least it must use JavaScript backend like Express.js. I have yet to come across any client-only authentication library. (It isn't that complex anyways)
Why Cookie

Ahh, the age-old argument of using cookies vs local storage. (I recommend you to have a read and get a better understanding of each pros and cons)
Personally, I would say cookies is more suitable for authentication because:
Can be set server-side, and doesn't require client-side to intercept the requests to add in the header.
Extension from above, it allows http-only flag (values cannot be accessed through JavaScript), helps to prevent XSS attack.
All cookies will be attached to the request header to the server, so no additional client-side configurations are needed.
Authentication should have an expiry date.
JWT or Session?
Technically, that is more of a server-side implementation than a client-side's. Here's a great article on it. Anyways, here are my 2 cents.
For small projects, I guess JWT is fine. While yes, it's not that safe (read the article), and has some issues, they are generally easier to setup with the abundant libraries available, and probably easy to understand for beginners too.
However, for larger projects, it's always better to migrate to the session for reasons like safety and easier to manage (again, from the article).
Project Setup
Let's start from scratch, using Next.js starter:
npx create-next-app
Here are some configurations that I chose, none are necessary for this project (Maybe TypeScript is necessary)
React Query

While I'd love to make the project as minimal as possible, but here's an additional library that I must use, which I also recommend you to use, tanstack's useQuery. It'll make requests much easier to manage.
yarn add @tanstack/react-query
And update src/_app.tsx
import "@/styles/globals.css";
import { QueryClient, QueryClientProvider } from "@tanstack/react-query";
import type { AppProps } from "next/app";
import { useState } from "react";

export default function App({ Component, pageProps }: AppProps) {
  const [queryClient] = useState(() => new QueryClient());
  return (
    <QueryClientProvider client={queryClient}>
      <Component {...pageProps} />
    </QueryClientProvider>
  );
}
Feel free to check out my other article on React Query to learn more about it!
Mock APIs
Before we get to the front end, let's set up some basic mock APIs to demonstrate the working of our system.
We will need three minimal API endpoints, which are /api/login, /api/logout and /api/me.
API login will set a http-only cookie to identify the user if the credentials are right while /api/me will return the user data if authenticated.
However, to get the cookie part working in Next.js API, you will need an additional library (which you won't be needing if you're using other API servers)
yarn add cookies-next
Login
A very simple API route to check if the credentials match, which will set cookies if they match
// /src/pages/api/login.ts

import type { NextApiRequest, NextApiResponse } from "next";
import { setCookie } from "cookies-next";

type Data = {
  status: "success" | "failure";
};

export default function handler(
  req: NextApiRequest,
  res: NextApiResponse<Data>
) {
  // You should also validate that it's a post request
  // Please don't use this in production, you should validate it at least
  const cred = JSON.parse(req.body) as { email: string; password: string };
  if (cred.email === "john@gmail.com" && cred.password === "secret") {
    setCookie("token", "ThisIsJohnToken", {
      req,
      res,
      httpOnly: true,
      maxAge: 60 * 60 * 24,
    });
    res.status(200).json({ status: "success" });
  } else {
    res.status(403).json({ status: "failure" });
  }
}
Validate Me
This API route will return the user's data if validated, or 403 status if not validated
// /src/pages/api/me.ts
import type { NextApiRequest, NextApiResponse } from "next";
import { getCookie } from "cookies-next";

type Data = {
  user?: {
    username: string;
    email: string;
  };
};

export default function handler(
  req: NextApiRequest,
  res: NextApiResponse<Data>
) {
  const token = getCookie("token", { req, res });
  if (token === "ThisIsJohnToken") {
    res
      .status(200)
      .json({ user: { username: "John", email: "john@gmail.com" } });
  } else {
    res.status(403).json({});
  }
}
Logout
The last API route to allow users to logout
import type { NextApiRequest, NextApiResponse } from "next";
import { setCookie } from "cookies-next";

type Data = {
  status: "success" | "failure";
};

export default function handler(
  req: NextApiRequest,
  res: NextApiResponse<Data>
) {
  setCookie("token", "ThisIsJohnToken", {
    req,
    res,
    httpOnly: true,
    // Small trick to delete the cookie by making it expired
    maxAge: -1,
  });
  res.status(200).json({ status: "success" });
}
and that's it with these changes, we are ready to go!
Auth Queries
Before actually going into the implementation, you still need one last thing, the auth queries. These are the queries that will be called to access the API routes.
I'll usually use Axios, but for the sake of simplicity, this article will be using the basic fetch API.
A quick briefing on use-query for those of you who don't know, it has some of these helpful features:
Query caching - Calling
use-queryat one place and another will not cause the API requests to be made again, instead the response will be cachedQuery refetch - After some time (refetchInterval or sometimes staleTime), the query will be refetched automatically
State Management - Still using
useStateto manage state anduseEffectto fetch queries when the page loads? use-query simplifies it, with additionalisLoading,isSuccess, andisErrorin addition to a few others, making our lives simpler.
Login Mutation
This is the most basic login function using the Fetch API, it'll just check if the response is 200.
// src/queries/auth.ts
type LoginCredentials = {
  email: string;
  password: string;
};

export const useLoginMutation = () => {
  return useMutation({
    mutationKey: ["login"],
    mutationFn: async (credentials: LoginCredentials) => {
      try {
        const res = await fetch("/api/login", {
          method: "POST",
          body: JSON.stringify(credentials),
        });
        if (!res.ok) {
          throw new Error();
        }
        return { message: "Successful" };
      } catch (ex) {
        throw new Error("Something went wrong");
      }
    },
  });
};
Get Active User
This query will call the current user's information, but it's still incomplete.
export const useGetCurrentUserQuery = () => {
  return useQuery({
    queryKey: ["current-user"],
    queryFn: async () => {
      const response = await fetch("/api/me");
      if (response.ok) {
        return (await response.json()).user as {
          username: string;
          email: string;
        };
      }
      throw Error("Unauthenticated");
    },
  });
};
Logout Mutation
This mutation will call GET on the logout route
// src/queries/auth.ts
export const useLogoutMutation = () => {
  return useMutation({
    mutationKey: ["logout"],
    mutationFn: async () => {
      await fetch("/api/logout");
    },
  });
};
PS: The queries are basic, but insufficient currently.
Authentication Form
Firstly, that's get the login form out for you to check if things work
// src/pages/index.tsx
import Header from "@/components/Header";
import { useGetCurrentUserQuery, useLoginMutation } from "@/queries/auth";
import Head from "next/head";
import { useState } from "react";

export default function Home() {
  const [email, setEmail] = useState("john@gmail.com");
  const [password, setPassword] = useState("secret");
  const mutation = useLoginMutation();

  const onSubmit = async () => {
    await mutation.mutate({ email, password });
  };
  return (
    <>
      <main>
        <h1>A simple client implementation for Authentication</h1>
        {/* This is a bad pattern, use something better in your project */}
        <div>
          {mutation.isLoading
            ? "Loading"
            : mutation.isError
            ? "Invalid credentials, please try again"
            : mutation.isSuccess
            ? "Login successfully, please wait while we redirect you..."
            : ""}
        </div>
        <form
          onSubmit={(e) => {
            e.preventDefault();
            onSubmit();
          }}
        >
          <label>
            Email
            <input
              value={email}
              onChange={(e) => setEmail(e.target.value)}
              required
              type="email"
            />
          </label>
          <label>
            Password
            <input
              type="password"
              value={password}
              onChange={(e) => setPassword(e.target.value)}
              required
            />
          </label>

          <button type="submit" disabled={mutation.isLoading}>
            {mutation.isLoading ? "Loading" : "Submit"}
          </button>
        </form>
      </main>
    </>
  );
}
And here's the header before you ask me
// src/components/Header.tsx
import { useLogoutMutation } from "@/queries/auth";
import Link from "next/link";

const Header = () => {
  const logoutMutation = useLogoutMutation();
  return (
    <nav>
      <Link href="/">Home</Link>
      <Link href="/protected">Protected Route</Link>
      <div className="spacer" />
      <a href="#" onClick={() => logoutMutation.mutate()}>
        Logout
      </a>
    </nav>
  );
};

export default Header;
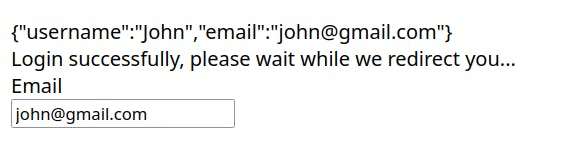
And you should be seeing the form when you start the web server with yarn dev or equivalent. (I have added some additional styles, which don't matter here)

After logging in, you should be able to find the cookie and the success message

Refetch Query
The authentication seems to work so far right? Except it's not, let's try to show the current user's information
// src/pages/index.tsx
...
  const mutation = useLoginMutation();
  const currentUser = useGetCurrentUserQuery(); // get the user

..

        <h1>A simple client implementation for Authentication</h1>
        {currentUser.isSuccess
          ? JSON.stringify(currentUser.data)
          : "Unauthenticated"}
...
If you have logged in previously, you should see this
However, if you were to click logout, you'll notice something strange. The text didn't change to "Unauthenticated"!
Supposedly, you'd expect the content of currentUser to change after every operation right? Well, as mentioned earlier, use-query will keep the response in the cache until it's stale or invalidated.
Let's do it, we will invalidate the query whenever the user logs in or logout successfully.
PS: This is quite important
// src/queries/auth.ts
export const useLoginMutation = () => {
  const queryClient = useQueryClient();
  return useMutation({
    mutationKey: ["login"],
    mutationFn: async (credentials: LoginCredentials) => {
      ...
    },
    onSuccess: () => {
      // The important line
      queryClient.resetQueries({ queryKey: ["current-user"] });
    },
  });
};

export const useLogoutMutation = () => {
  const queryClient = useQueryClient();

  return useMutation({
    mutationKey: ["logout"],
    mutationFn: async () => {
      await fetch("/api/logout");
    },
    onSuccess: () => {
      // The important line
      queryClient.resetQueries({ queryKey: ["current-user"] });
    },
  });
};
And we have setup everything required.
Page Level Permission
So how do we make certain page accessible to public while others only available for authenticated users?
I was inspired by Next.js's Layout Pattern to attach the information as the component's properties
// src/pages/index.tsx
const Home = () => {
  ...
}

Home.isPublic = true;
export default Home;
To make it compatible with TypeScript, let's also add the types
// src/pages/_app.tsx

// Again, this is referenced from Next.js documentation
import "@/styles/globals.css";
import { QueryClient, QueryClientProvider } from "@tanstack/react-query";
import { NextPage } from "next";
import type { AppProps } from "next/app";
import { useState } from "react";

export type NextPageWithProperties<P = {}, IP = P> = NextPage<P, IP> & {
  isPublic?: boolean;
};

type AppPropsWithProperties = AppProps & {
  Component: NextPageWithProperties;
};

export default function App({ Component, pageProps }: AppPropsWithProperties) {
  const [queryClient] = useState(() => new QueryClient());
  return (
    <QueryClientProvider client={queryClient}>
      <Component {...pageProps} />
    </QueryClientProvider>
  );
}
and using it with the Home,
// src/pages/index.tsx
const Home: NextPageWithProperties = () => {
as simple as that!
PS: Changing component properties will require a full refresh to take effect, hot reloads don't update it.
Lastly, let's also add a protected page which is not public.
// src/pages/protected.tsx
import Header from "@/components/Header";
import Head from "next/head";
import { NextPageWithProperties } from "./_app";

const Protected: NextPageWithProperties = () => {
  return (
    <>
      <Head>
        <title>Create Next App</title>
        <meta name="description" content="Generated by create next app" />
        <meta name="viewport" content="width=device-width, initial-scale=1" />
        <link rel="icon" href="/favicon.ico" />
      </Head>
      <Header />

      <main>
        <h1>This is a protected page</h1>
      </main>
    </>
  );
};

// this will require authentication
Protected.isPublic = false;

export default Protected;
So in the end, we will have two pages,
/          => public route
/protected => private route: requires authentication
Route Guard

Now, this is probably the most important part of this tutorial, which is what makes page protection possible.
It works by acting as a wrapper around the page, by examining the page's isPublic and currentUser to determine if the page should be shown or not.
Let's first make a wrapper around the main component in _app.ts
// src/components/RouteGuard.tsx
import { NextPageWithProperties } from "@/pages/_app";
interface RouteGuardProps {
  Component: NextPageWithProperties;
  pageProps: any;
}

const RouteGuard = ({ Component, pageProps }: RouteGuardProps) => {
  return <Component {...pageProps} />;
};

export default RouteGuard;
And wrapping it in our _app.tsx
// src/pages/_app.tsx
export default function App({ Component, pageProps }: AppPropsWithProperties) {
  const [queryClient] = useState(() => new QueryClient());
  return (
    <QueryClientProvider client={queryClient}>
      <RouteGuard Component={Component} pageProps={pageProps} />
    </QueryClientProvider>
  );
}
Protecting Non-Public Pages
Right now, the RouteGuard isn't doing much, let's start by blocking all non-public pages to see it working.
// src/components/RouteGuard.tsx
const RouteGuard = ({ Component, pageProps }: RouteGuardProps) => {
  if (!Component.isPublic) {
    return "You are unauthenticated to view";
  }
  return <Component {...pageProps} />;
};
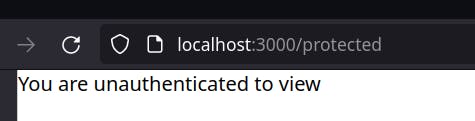
Heading back to the website, and visit /protected, the page should look blocked to you
Of course, while this works, you'd typically want to redirect the user instead.
Let's use useEffect to redirect the users to / when they visit a non-public page. What about the dependency? We can examine the page's isPublic whenever they visit a new page, so that's when the Component changes.
// src/components/RouteGuard.tsx
const RouteGuard = ({ Component, pageProps }: RouteGuardProps) => {
  const router = useRouter();
  useEffect(() => {
    if (!Component.isPublic) {
      router.push("/");
    }
  }, [Component]);
...
and.... the user shouldn't be able to visit the page anymore! So far so good.
Retrieving User Information
Of course, that'd be bad. Even authenticated users wouldn't be able to visit the protected page when they should!
It's time to add the useGetCurrentUserQuery we created earlier so that the RouteGuard knows the context.
// src/components/RouteGuard.tsx
const currentUser = useGetCurrentUserQuery();
and instead, the protected page should only be blocked if the page is non-public and the user is unauthenticated.
Let's modify the conditions
// src/components/RouteGuard.tsx
  const isAuthenticated = Component.isPublic || currentUser.isSuccess;

  useEffect(() => {
    if (!isAuthenticated) {
      router.push("/");
    }
  }, [Component]);

  if (!isAuthenticated) {
    return "You are unauthenticated to view";
  }
Everything looks good!
But if you have a pair of keen eyes, you'd notice something's missing. What if the user is authenticated, but the query hasn't load finish?
Query Loading
That is, what if the user refresh the page when they are in a non-public page, causing the useGetCurrentUserQuery to run, so its isSuccess will be false initially. You can try it yourself, login and head to /protected, and refresh. You should be redirected back to home.
We will now need to consider a third condition, when isAuthenticated is loading.
// src/components/RouteGuard.tsx
  useEffect(() => {
    if (!isAuthenticated && !currentUser.isLoading) {
      router.push("/");
    }
  }, [Component]);
Likewise, you should display some loading page when the query is running initially. Normally, I'd like to take this chance and put a nice little splash screen like the Instagram Clone that I made earlier (inspired by Instagram, of course)

To do that, we will add another condition, we will only show the splash screen if the page is private, otherwise, why want to delay user flow right?
// src/components/RouteGuard.tsx
  if (session.status === "loading" && !Component.isPublic) {
    // Feel free to change this to a nice SplashScreen component
    return "Loading...";
  }

  if (!isAuthenticated) {
    return "You are unauthenticated to view";
  }
And.... that's it, you got yourself a fully working client authentication system!
All you need is some nice-looking UI and good logic, then it's another project done.
Here are the full codes for RouteGuard.tsx
// src/components/RouteGuard.tsx
import { NextPageWithProperties } from "@/pages/_app";
import { useGetCurrentUserQuery } from "@/queries/auth";
import { useRouter } from "next/router";
import { useEffect } from "react";
interface RouteGuardProps {
  Component: NextPageWithProperties;
  pageProps: any;
}

const RouteGuard = ({ Component, pageProps }: RouteGuardProps) => {
  const router = useRouter();
  const currentUser = useGetCurrentUserQuery();
  const isAuthenticated = Component.isPublic || currentUser.isSuccess;

  useEffect(() => {
    if (!isAuthenticated && !currentUser.isLoading) {
      router.push("/"); // or login page
    }
  }, [Component]);

  if (currentUser.isLoading) {
    return "Loading...";
  }

  if (!isAuthenticated) {
    return "You are unauthenticated to view";
  }

  return <Component {...pageProps} />;
};

export default RouteGuard;
Do read on though, there's a bonus section and some alternatives.
Bonus: useSession
While using useGetCurrentUserQuery is quite convenient itself, it can be better.
I was heavily inspired by NextAuth's useSession API which made things really simple!
Therefore, I imitated it a little, and basically wrapped the useGetCurrentUserQuery in this useSession
// src/utils/useSession.ts
import { useGetCurrentUserQuery } from "@/queries/auth";
import { useMemo } from "react";

type Session =
  | {
      status: "loading" | "unauthenticated";
      user: undefined;
    }
  | {
      status: "authenticated";
      user: { username: string; email: string };
    };

const useSession = () => {
  const { data, isError, isSuccess, isLoading } = useGetCurrentUserQuery();

  const session: Session = useMemo(() => {
    if (isSuccess && data.status === "success") {
      return {
        status: "authenticated",
        user: data.user as { username: string; email: string },
      };
    }
    if (isError) {
      return { status: "unauthenticated", user: undefined };
    }
    if (isLoading) {
      return { status: "loading", user: undefined };
    }
    return { status: "unauthenticated", user: undefined };
  }, [data, isError, isSuccess]);

  return session;
};

export default useSession;
I also updated the useGetCurrentUserQuery a little so that it doesn't just throw errors because throwing errors will make useQuery to refetch the queries, so let's optimize it
// src/queries/auth.ts
export const useGetCurrentUserQuery = () => {
  // You might want to optimize the types a little, it's messed up
  return useQuery({
    queryKey: ["current-user"],
    queryFn: async () => {
      const response = await fetch("/api/me");
      if (response.ok) {
        const data = (await response.json()).user as {
          username: string;
          email: string;
        };
        return { status: "success", user: data };
      }
      return { status: "failure", user: null };
    },
  });
};
No complex logic, but a simple hook can make our lives so much easier. Let's now head to RouteGuard and replace the query with useSession
// src/components/RouteGuard.tsx
const RouteGuard = ({ Component, pageProps }: RouteGuardProps) => {
  const router = useRouter();
  const session = useSession();
  const isAuthenticated =
    Component.isPublic || session.status === "authenticated";

  useEffect(() => {
    if (!isAuthenticated && session.status !== "loading") {
      router.push("/");
    }
  }, [Component, session.status]);

  if (session.status === "loading" && !Component.isPublic) {
    return "Loading...";
  }

  if (!isAuthenticated) {
    return "You are unauthenticated to view";
  }

  return <Component {...pageProps} />;
};
I don't know about you, but I certainly prefer this way more (They call it abstraction). You can even further improve this with isAuthenticated, isUnauthenticated, isLoading...
Check out the complete codes from my GitHub.
(I also added a bit more codes to show the complete process)
Last Words
As I said, the codes just work, but there are plenty of other ways too, here are some that came out of my head when I was working on this project
Middleware
Redirecting or blocking users from accessing the page seems like the perfect thing for middleware right? And you're right!
There's one caveat though, you'd need to verify the cookie each time user visits a page (rather than having a cached result). If Nextjs is your backend, that'd probably be okay, but if it's not? That'd result in hundreds of requests!
Of course, I believe that there's a better way of doing it, but I'm not aware of it currently.
Also, you can use URL pattern matching if you use middleware instead.
Client-side cookies?
I actually used client-side cookies initially, but as I said, it's susceptible to XSS attacks, so I guess it's safer to do it server-side.
Must I use React-Query?
Of course not! Alternatively, there's also SWR, or you can even implement the vanilla way without them, just that these libraries make your life simpler
Beyond just plain authentication, RouteGuard can also be further expanded to verify the user's role and other parameters.
Of course, all these are done on the client side, and it might be tampered with, so make sure the routes are also well protected from the backend!
Again, here's the GitHub link: nextjs-client-authentication.